Writing
Building a Fabric Digital Twin with Rayfin — Part 1: From Scaffold to Live Data
- fabric
- rayfin
- digital-twin
- threejs
- copilot
I’m writing a series of blog posts to explain how to get started developing with Fabric Rayfin apps. The first part of the series is how to get started with development and deploy your app to Fabric.
- First prototype: a Rayfin app with a Three.js scene driven by database telemetry (this post)
- A realistic turbine and terrain: modeling a wind turbine in Blender with Copilot, plus a pipeline to process laser-scanned terrain and vector map data into 3D terrain.
- The AI layer: building a real-time Foundry agent over a Fabric KQL backend with a live voice copilot.
A digital twin is only interesting when it’s live. The goal for this app is to build a wind farm you can explore in 3D and interrogate in plain language, either by text or by voice. By the end we’ll have a Fabric Rayfin app that looks and behaves like something you’d put in front of an operations team.
But that’s the finish line. This first post is about getting started: getting from an empty workspace to a Microsoft Fabric app that renders a 3D scene and pulls its numbers from a real database. No fancy AI agent yet — just the skeleton, standing up and showing live data.
Rayfin is an open-source SDK and CLI for building apps whose backend lives inside Microsoft Fabric. You define your data model in TypeScript, run one command, and Rayfin provisions the database, authentication, APIs, storage and hosting for you. Out of the box you get Fabric SSO, hosting and a database without needing to deploy any infrastructure.
Getting started with Fabric apps
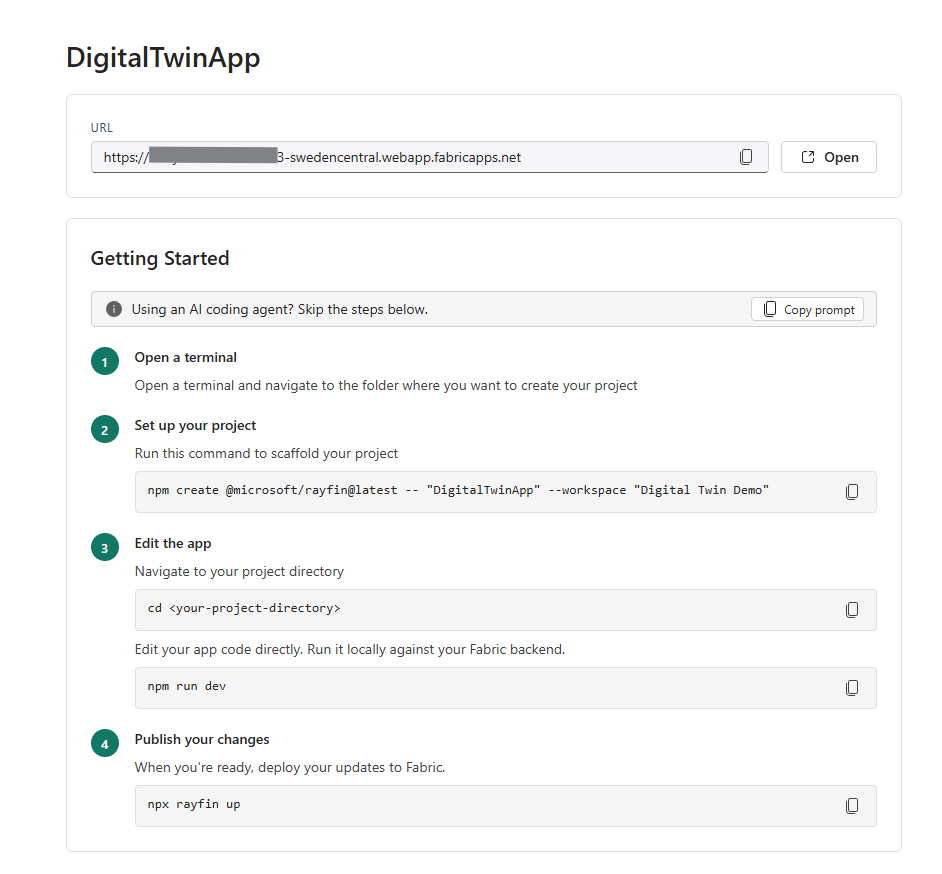
Getting started is super simple and fast. Just create a new App item in a Fabric workspace and you’ll have the instructions to get started in front of you.
If you’re using an AI coding assistant you can copy the starter prompt with one click, or you can follow the instructions. Bootstrapping the app is just a couple of commands.
Plan it with Copilot first
After the scaffolding and before writing a line of code, this whole app started as a plan. I was using GitHub Copilot to speed up my development workflow. I described my end goal for the app — “a 3D digital twin with real-time telemetry, a data generator, a KQL database, a Foundry agent, and a voice interface” — and I got back a plan and a sequenced architecture: what to build first, what each layer depends on, and where everything fits together.
In the plan the app consisted of different layers:
- 3D digital twin visualization with a Fabric App using React, Vite and Three.js.
- Real-time data ingestion and processing layer with Fabric RTI Eventhouse and Eventstream.
- Agent layer in Microsoft Foundry with GPT-realtime-2 powered multi-lingual voice chat.
That plan becomes the spine of the series. Part 1 is the first milestone off it: stand up the app and prove data flows end to end. Everything after is filling in the plan, one layer at a time.
A wind farm twin needs to know about turbines, the components inside them, and the weather blowing through the site. In Rayfin you describe those as entities with decorators, and the framework turns them into SQL tables:
import {
  authenticated,
  decimal,
  entity,
  int,
  many,
  text,
  uuid,
} from '@microsoft/rayfin-core';

import { Component } from './Component.js';

@entity()
@authenticated('*')
export class Turbine {
  @uuid() id!: string;
  /** Business key from the snapshot, e.g. "WT-01". */
  @text({ max: 40, unique: true }) turbineId!: string;
  @text({ max: 120 }) name!: string;
  @text({ max: 120 }) type!: string;
  @decimal() ratedCapacity!: number;
  @decimal({ precision: 9, scale: 5, optional: true }) latitude?: number;
  @decimal({ precision: 9, scale: 5, optional: true }) longitude?: number;
  // ...
  @many(() => Component) components?: Component[];
}
Each entity (for example Turbine) is a decorated TypeScript class. Running npm run dev
calls rayfin up to provision your services, turning those definitions into real tables
in the Fabric SQL data layer and giving you a typed client to read and write them.
Locally, npm run dev serves the app on Vite (http://localhost:5173) with simple login
for fast iteration. The same code uses Fabric SSO automatically once it’s deployed. And
it’s impossible to deploy to Fabric without authentication, so your data stays behind
authentication at all times. Deploying is as simple as running npx rayfin up.
This data model part matters for the rest of the series: the same Turbine and
Component entities that store our seed data in Part 1 become the binding targets for the
3D model in Part 2, and the grounding context for the AI in Part 3. Get the model right
once, reuse it everywhere.
A first 3D prototype with Copilot
With the app authenticating and the data layer live, now the fun part: a 3D scene. Three.js is an easy-to-use 3D library for the browser that has a huge community and uses WebGL and WebGPU for powerful rendering. This makes it a perfect choice for our demo.
This is where GitHub Copilot earns its keep. Describe what you want: “a Three.js scene with a ground plane, a few turbines laid out on a grid, an orbit camera, and soft daylight”.
The code structure is simple:
HomePage → Twin3DView → SceneEngine- HomePage is just the page that hosts the twin.
- Twin3DView is a thin React wrapper around the scene.
- SceneEngine is framework-agnostic Three.js — it knows nothing about React, which keeps the rendering loop clean and testable.
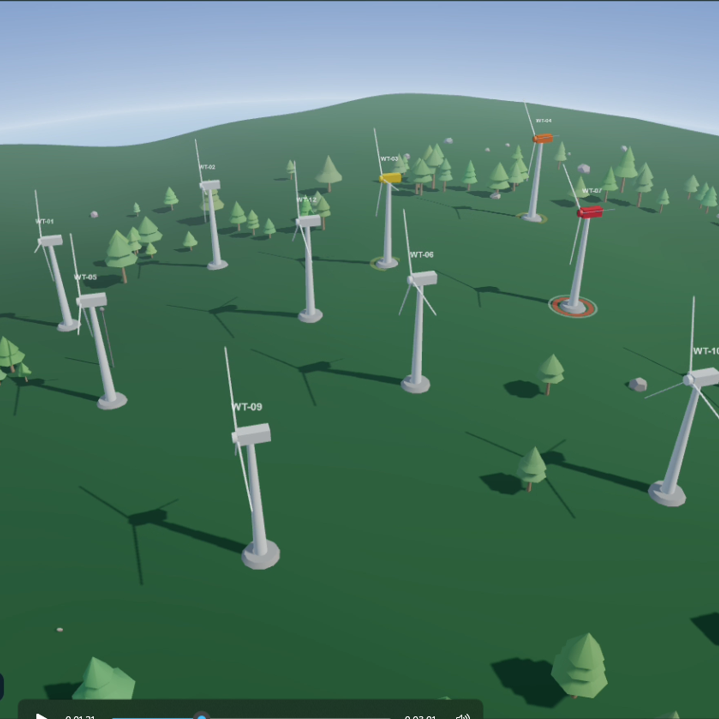
At this stage the turbines are crude, just boxes and cylinders standing in for the real model. That’s intentional. The point of Part 1 is the pipeline, not the polish. We want pixels on screen that move when the data moves.
“Telemetry” from the database
Here’s where it comes together. We seed the Turbine and Weather tables with a handful
of rows — a small fleet and current conditions — and then read them back through the
Rayfin client.
Those values drive two pieces of on-screen chrome:
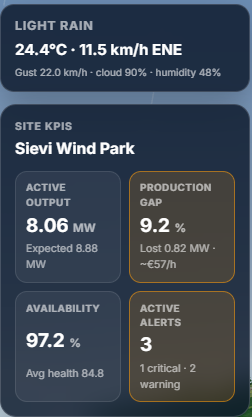
- SiteKpiOverlay: a live KPI panel — actual vs. expected production, availability, average health score.
- WeatherCard: current wind speed, direction, and temperature for the site.
It’s not real-time streaming yet (that’s Part 3, when we move to Fabric Real-Time Intelligence and a KQL backend). But it is a real database, queried through a real typed client, rendering into a real 3D app — and that’s the proof that the whole stack is wired correctly.
By the end of Part 1 we have:
- ✅ Auth wired for Fabric SSO (with password login for local dev)
- ✅ A data layer holding turbines, components, and weather
- ✅ A Three.js scene rendering a placeholder wind farm
- ✅ KPIs and weather on screen, read from the database
What’s next
In Part 2, we throw away the placeholder boxes. We’ll use Blender to generate a realistic wind turbine with named components matching real PLM part IDs and load it into the scene. With that we can build an exploded engineering view that lets you pull the turbine apart, component by component, with each piece bound to its data.
We’ll also look at a pipeline to use National Land Survey of Finland (Maanmittauslaitos) open data: laser-scanned elevation points become the terrain heightmap, and map vector layers add forests, fields, roads, water and power lines.
Try it yourself: scaffold a Rayfin app from the Fabric portal, define a schema.ts
with a single entity, run npm run dev, and render one value from it on screen. Once data
flows end to end, everything else is detail.